A front door is more than just an entry point—it is one of the first things people notice about a home. In areas like Maple Ridge, Coquitlam, Langley, Pitt Meadows, and Port Coquitlam, exterior wood doors are constantly exposed to rain, UV rays, temperature changes, and moisture. Over time, even high-quality wood doors begin to fade, discolor, peel, and lose their original beauty.
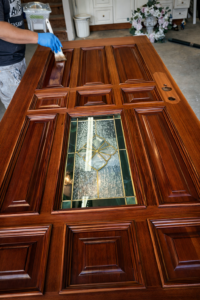
Recently, we completed a complete front door restoration and staining project, transforming a weathered exterior wood door into the rich, elegant finish shown below. This process involved much more than simply applying a new coat of stain. Proper door staining requires careful preparation, restoration, color correction, and finishing to achieve professional and long-lasting results.
Why Proper Door Staining Matters
Many homeowners believe a front door can simply be sanded and re-stained. While that may work for minor maintenance, heavily weathered doors require a complete restoration process.
Without proper preparation:
- Old stain can bleed through the new finish.
- Uneven coloring can occur.
- Wood fibers can become damaged.
- New stain may fail prematurely.
- The finished appearance may look blotchy or inconsistent.
Professional exterior staining focuses on restoring the wood first, then applying a finish that enhances both appearance and durability.
Step 1: Protecting Surrounding Areas
Every restoration project begins with careful masking and protection.
Any glass inserts, hardware, weather stripping, and surrounding surfaces that are not intended to be stripped or stained must be protected before work begins.
This step prevents chemical damage and ensures a clean, professional result throughout the restoration process.
Step 2: Applying Stain Remover
For this project, we used Circa stain and paint remover to break down the existing finish.
The remover is applied generously across the door surface, ensuring complete coverage. Once applied, the product begins softening the existing stain and clear coat, allowing them to separate from the wood fibers.
This stage is critical because leaving behind old finish can affect the final color and adhesion of the new stain.
Step 3: Covering with Plastic
After applying the stripper, the door surface is covered with plastic sheeting (poly).
Many people skip this step, but covering the product significantly improves its effectiveness by:
- Slowing evaporation
- Allowing deeper penetration
- Extending working time
- Improving the removal of stubborn coatings
This helps the stripper work more efficiently and reduces the amount of scraping required later.
Step 4: Scraping Away the Old Finish
Once the coating has softened, the old stain and finish are carefully scraped away.
This stage often reveals the true condition of the wood underneath. Areas that have been exposed to years of sunlight or moisture may require additional restoration work.
Care must be taken around profiles, decorative moldings, corners, and glass inserts to avoid damaging the wood.
Step 5: Repeating the Stripping Process
One application is rarely enough on heavily stained exterior doors.
To achieve a truly clean surface, the stripping process is repeated as necessary until the majority of the old finish has been removed.
Patience at this stage directly affects the quality of the final result.
Step 6: Detailed Cleaning with Lacquer Thinner
Even after stripping, traces of old stain often remain trapped in corners, grooves, and detailed profiles.
Lacquer thinner is used to remove these stubborn remnants and clean the surface thoroughly.
This detailed cleaning step ensures:
- Better stain penetration
- More uniform color
- Cleaner profiles and moldings
- Improved final appearance
Step 7: Multi-Stage Sanding Process
Sanding is where the door truly begins to come back to life.
Rather than jumping directly to a fine grit, we progressively sand through multiple stages:
60 Grit
Removes remaining finish residue and levels imperfections.
180 Grit
Refines the surface and removes deeper sanding scratches.
220 Grit
Creates a smooth and consistent finish.
320 Grit
Provides a furniture-grade surface ready for staining.
Progressive sanding is essential because skipping grits often leaves visible scratches that become magnified once stain is applied.
Step 8: Oxalic Acid Treatment
After years of weather exposure, wood often develops uneven coloration, dark water stains, and discoloration.
To correct this, we apply oxalic acid, a professional wood brightener and bleaching agent.
Oxalic acid helps:
- Remove tannin stains
- Lighten dark areas
- Blend color variations
- Restore a more uniform wood tone
This step is especially important when restoring exterior entry doors that have experienced significant weathering.
One side effect of oxalic acid is that it softens the wood fibers, which is completely normal and expected during the restoration process.
Step 9: Conditioning the Wood
After bleaching and cleaning, the wood can become thirsty and uneven in its absorption rate.
To help balance the surface, we apply Minwax Wood Conditioner.
This helps:
- Improve stain absorption
- Reduce blotchiness
- Enhance color consistency
- Create a more even finish
Conditioning is one of the most overlooked steps in wood restoration, yet it has a significant impact on the final appearance.
Step 10: Applying the First Coat of Stain
Once the surface is fully prepared, the first coat of Minwax Stain & Clear All-In-One is applied.
The first coat establishes the foundation of the final color while highlighting the natural grain patterns within the wood.
At this stage, the transformation becomes immediately visible as the richness and depth of the wood begin to emerge.
Step 11: Drying Time
A professional finish requires patience.
After the first coat is applied, the door is left to cure for approximately two days.
Allowing sufficient drying time helps ensure proper adhesion between coats and improves the durability of the finished system.
Step 12: Buffing Between Coats
Before applying the final coat, the surface is carefully polished using:
- #0000 steel wool
- 320-grit sandpaper
This removes minor imperfections, smooths the finish, and creates an ideal surface for the second application.
The result is a smoother, richer, and more refined final appearance.
Step 13: Applying the Final Coat
The second coat is applied to build depth, enhance color, and increase protection.
This coat provides:
- Greater UV resistance
- Improved moisture protection
- Richer color tone
- Enhanced wood grain definition
The goal is not simply to make the door look beautiful today, but to help protect it from future weather exposure.
Step 14: Final Cleanup and Inspection
The final stage involves removing all masking materials, cleaning glass inserts, inspecting the finish, and ensuring every detail meets professional standards.
The result is a restored entry door that dramatically enhances curb appeal and helps protect the wood for years to come.
Professional Door Staining in Maple Ridge, Coquitlam & Langley
If your front door is faded, peeling, weathered, or losing its original beauty, a professional restoration can often save the door and restore its appearance without replacement.
We specialize in:
✅ Front door restoration
✅ Exterior door staining
✅ Cedar staining
✅ Wood refinishing
✅ Exterior staining services
✅ Deck staining
✅ Fence staining
✅ Wood restoration and protection
Serving homeowners throughout Maple Ridge, Coquitlam, Port Coquitlam, Pitt Meadows, Langley, Surrey, and surrounding areas, we focus on restoring and protecting exterior wood surfaces while delivering finishes that look beautiful and stand the test of time.
A properly restored wood door doesn’t just improve curb appeal—it creates a welcoming first impression every time someone approaches your home.
Looking for the best painters and exterior staining specialists in Maple Ridge or Langley? Contact us today to discuss your front door restoration project and bring new life back to your home’s entrance.